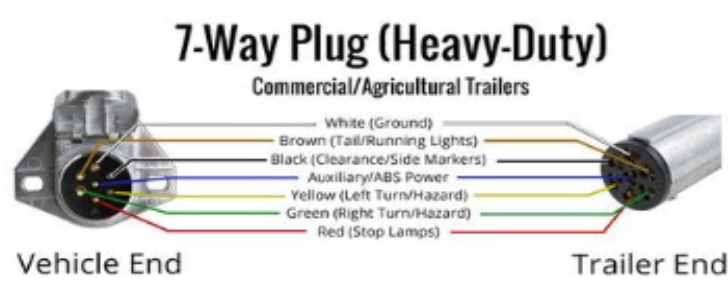
Warranty Registration Form Warranty Registration Form Trailer VIN: Model: Date Purchased: Customer: Address: City: State: Zip: Contact: Email: Phone: Dealership: Address: City: State: Zip: Contact: Email: Phone: Pre-Delivery Inspection The following items to be inspected and/or performed prior to a new trailer being put into service. Hitch height – For tongue pull type trailers – Adjust hitch to match the truck hitch height. It is recommended to set trailer tongue approx. 2” above trailer level so when trailer is loaded with proper weight forward on hitch (60%) trailer will tow in a near level position. Safety Chains – Safety Chains are designed to adjust to desired length to allow adequate length for turning and avoid dragging on roadway. Adjust to the desired length by adjusting through the keyhole slots on side of hitch tube. Air Brakes – Spring Brake Chambers need to be uncaged as part of the in-service procedure. While brakes are caged, they allow for a trailer to be moved around without air pressure to the brake system. Purpose of Spring Brake Chambers is to act as a safety braking system in the event of loss of air pressure. See Mechanical Release of Spring Brake Pg. 8 https://www.haldex.com/globalassets/northamerica/documents/actuators/l31171.pdf Tire Pressure – Check tires for recommended pressure listed on the sidewall of the tire. Pressures are checked during installation at the factory; however, tires can lose air pressure over time and is a good practice to check prior to each use. Oil Bath Hubs – Check oil levels in all hubs prior to use. Use a 75W-90 Synthetic Gear Oil. Do not fill past the Full line shown on the glass window of the hub cap. Check Lug Nuts for proper torque after the first 100 miles of use and again after 500 miles. Torque to 450 Ft/Lbs. Deck Latch – Located on roadside of the side rail near the rear of the Stationary Deck. A push/pull air valve can be actuated once air pressure is above 60-70 psi. When pushed, the deck latch will release allowing the deck to tilt. Actuated simultaneously, is the rear bumper (rear impact guard) retracts as the deck latch is released. Caution – Always make sure that deck is leveled, latched and bumper has released before moving trailer. Wood decking treatment – If the trailer has been sitting for a while, it may be necessary to add another treatment of wood preservative. Using a paint roller is a good practice for applying preservative after the wood has been installed on the trailer. Most any wood preservative works well. Lights/Electrical and ABS Brake system – First, determine that the tow vehicle is compatible to the wiring diagram below and that all circuits are active. When hooking up to the tow vehicle, ensure the trailer’s air system is fully charged, then connect the 7-way trailer plug to the vehicle and proceed to check all functions. Note: the ABS indicator lamp is located on the road side at the rear of the trailer marked “ABS” It will initially aluminate with the other lights. Once trailer is in motion, ABS indicator lamp should go off which indicates system is working correctly. iABS Blink Code Diagnostics – Sealco Load Securement – In addition to D-Rings on the side of the trailer, we also provide what we call Stake Pocket/Chain Slots on top of the deck side rails and inner rails. The pockets are designed for a 1 ½” x 2 ½” tube that can be inserted for securing bulk items such as pipe or other items that require securement prior to tying down. The chain slots are designed to connect a chain link within the slot for securing equipment. (See attached diagram for use) Ready to experience the VersaMax difference? Contact Us Today!